Category Archives: The Process

Trinidad: Art Workshop

CrestedOropendola ASA L1410804eTrinidad: Nature & Wildlife 
Art Workshop

Immerse your senses into the bounty of the tropics and you will find endless inspiration to breathe new life into your artwork. Join me during this wonderful upcoming workshop presented by Victor Emanuel Nature Tours (VENT).

Click this link to the VENT website for details, itinerary, pricing and more information about this exciting tour and workshop.

This workshop and tour is geared toward beginner and advanced nature enthusiasts interested in ample opportunities to capture wildlife through art or journaling while being immersed in a tropical setting – the world famous Asa Wright Nature Centre. Whether you are a birdwatcher who has always wanted to draw birds in the field but has not found the right setting, or an avid journal keeper, a blossoming watercolorist or an experienced landscape painter, this workshop will offer a balanced combination of structure and freedom to create art at your own pace. Most important, the abundant tropical birds, stunning rainforests of Trinidad and rustic setting of the estate house will grant you long-lasting inspiration.

CrestedOropendola ASA L1410804h

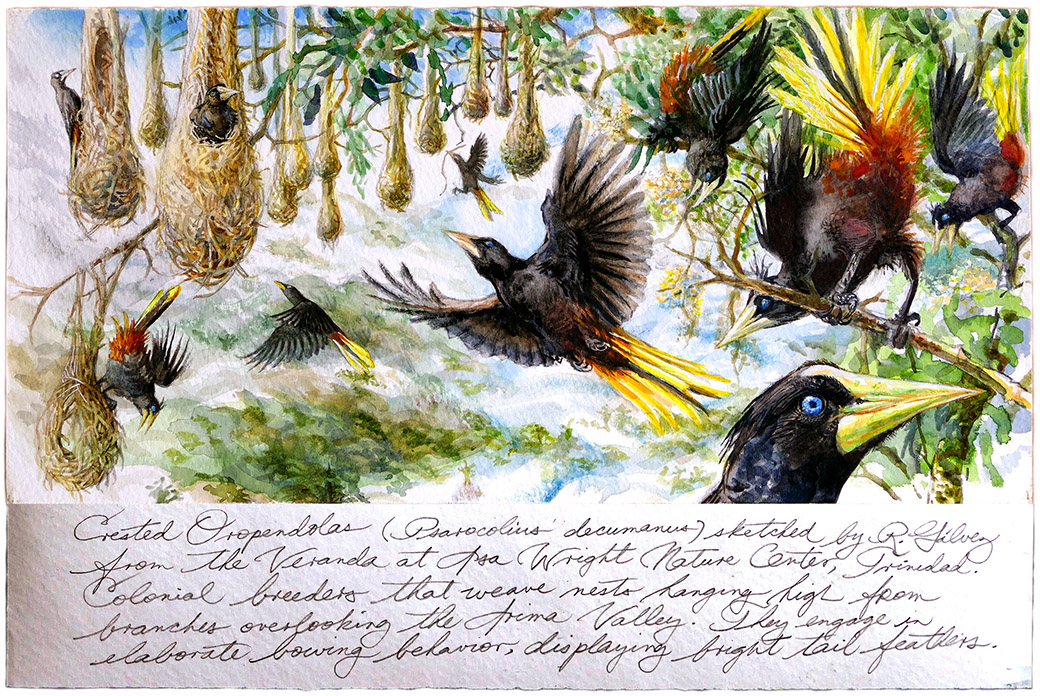
Detail of a sketch (5.75″ x 12″) done at the Asa Wright Nature Centre veranda, Trinidad. This watercolor was started during June of 2012, and then finished during February of 2016. Crested Oropendolas are colonial breeders, and weave long basket-like nests suspended from the branches of large trees that hang over the Arima Valley.

This workshop will be centered on a six-night stay at Asa Wright’s great estate, lodge and preserve. The historic plantation house has been visited by a number of renowned ornithologists and artists including William Beebe, David Snow, and renowned American painter Don Eckelberry, who depicted a number of Trinidad’s birds and their habitats. As with many other researchers and artists, they were attracted to the wide array of tropical species representative of New World bird families found at the preserve, including trogons, manakins, motmots, parrots and antbirds, and the lush habitats teeming with epiphytes, lianas and blooms.

Asa Wright Nature Centre is the ideal location for a nature art workshop because the ample veranda at the estate is a “living” studio that offers close views of feeders that attract many birds and other wildlife, with vistas of the expansive Arima Valley, and access to trails into tropical forests. Without leaving the veranda, participants will observe hummingbirds of several species including Tufted Coquette, tanagers and honeycreepers such as Blue Dacnis, Bananaquits and many other colorful feathered gems. Ample subject matter is readily available to the nature artist, and the facilities at the preserve offer a variety of settings for those interested in working in close proximity to the outdoors.

CrestedOropendola ASA L1410804i

Detail showing Crested Oropendolas (Psarocolius decumanus) engaged in elaborate nuptial displays that include bowing from their perches and from overhanging nests, and displaying their bright yellow tails and rusty vents.

Participants are invited to immerse their senses into the bountiful nature of Trinidad to find new inspiration for their artwork, and to work in a supportive setting, surrounded by like-minded individuals. The goal is to create work influenced by the field experience with a focus on personal growth. This workshop is ideal for those that have already developed a personal craft, and for those who would like to play with line and color, learn new techniques, and participate in constructive group sessions. Participants are encouraged to work with the materials of their choice and on the subject matter that most interests them. Emphasis will be placed on the depiction of fauna, flora and habitat from direct observation. Sketching or painting while viewing wildlife through a spotting scope or binoculars can be quite effective. Those who wish to work from their own photographs may do so. Each participant is responsible for bringing his/her own optic and photographic equipment and art materials.

Golden-headed Manakin Sketches

Click to enlarge – Various sketchbook studies of Golden-headed Manakin males engaged in lekking behavior, which includes sideways dancing, foot-tapping and sliding along display perches, vowing and chest-puffing, wing-vibrating, and darting up and down branches. Most of the sketches were done on February 2012, with touch-ups during February 2016 at leks within the Asa Wright preserve.

Throughout this workshop, you will be guided by experienced naturalists and artists. The leaders have extensive experience in the visual arts when it relates to nature, particularly the depiction of birds in their habitats, and have acquired significant experience by working in the field. The workshops, hikes and presentations offered during this tour are designed to give nature artists enough structure and support when needed, and the freedom and flexibility for those seeking independence. During our morning hikes, we will have an opportunity to study the birds, butterflies and plants of the preserve, and become acquainted with the trails that lead to the leks of manakins and the haunts of bellbirds. Your guides will be field sketching, painting or journaling right alongside participants, demonstrating techniques, leading group exercises, and working with those needing individual help. You will have the option of taking part in structured exploratory workshops for the strengthening of drawing and composition skills, or follow your own pace. More importance will be placed on process rather than product. Participants have the liberty to focus on simple projects like creating a series of loose sketches throughout the tour, or dedicating their entire time to a sketchbook, or developing as ambitious a series of works as desired. There will be plenty of free time to explore the grounds on your own and find subject matter of your liking, to study the birds and plants at your own leisure, or to spend most of the time participating in structured workshops.

Field trips away from the lodge should produce encounters with a number of particularly spectacular tropical birds and landscapes. Throughout the tour we will be keeping a detailed list of all our observations, as is done in traditional birding tours. Each evening we will have recap sessions during which we will share our progress, give feedback to those who desire it, and learn about other artists. Trinidad is a wonderful entrée to the natural history of the American tropics and its marvelous biodiversity. Birders, naturalists, sketchers and painters alike will find the Asa Wright Nature Centre inspiring, and this workshop will offer a broad range of options for both beginners and advanced artists.

TRINIDAD: NATURE & WILDLIFE ART WORKSHOP
FEBRUARY 23 – MARCH 1, 2017

More blog entries about sketching in Trinidad & Tobago:

VENT2_kicsi

To find our more about tours led by Rafael Galvez visit the
Victor Emanuel Nature Tours website.

Sketching through a Scope: Basics

The practice of sketching animals in the field while observing them through a spotting scope has been in use for quite some time, and many wildlife artists employ it.  For commentary on the benefits of using sport optics for field sketching, read my article – Why Use Sport Optics to Sketch Wildlife?

In a nutshell, a spotting scope  gives us detailed images of animals that allow us to create drawings and paintings of great complexity and precision. These days, spotting scopes and tripods are light and compact enough, that they allow for easy portability when we are pursuing fleeting subjects – such as birds – even when we are carrying additional gear and supplies.

With a stable tripod, your hands are free to hold your sketch pad while you observe your subject through the scope. It helps to be familiar with the functions of your scope and tripod before setting out to sketch with them.

TRY THIS:

Rafael Galvez SKETCHING SCOPE

  • Find your subject through the scope and zoom to the desired view.
  • Position yourself in a comfortable location.
  • Adjust the height of the tripod so that you don’t have to move your head much to look down at your pad and look through the scope.

Above, I am sitting at the edge of the boardwalk at Magee Marsh in NW Ohio, looking at a Long-eared Owl through my scope. I’ve tilted the tripod so that both my sketchbook and the eyepiece are in view without having to move my head. This last point would not be possible without an angled eyepiece, which I’d recommend over a straight scope for this purpose.

RafaelGalvez sketchingSCOPE

For this owl, I am using an angled Leica Televid APO 65 scope, a pocket pad and a #2 pencil. Sketching through a scope works well for both standing positions, and lengthier sitting efforts. In this case, the boardwalk made for a great impromptu seat.

GALVEZPainting at Snake Bight

Above is a watercolor of many wading birds done from Florida Bay over several visits. In this instance, I am working from the boardwalk at the end of Snake Bight trail, in the Everglades. There is a bench out there where I can place my watercolors, brushes, water and stretched paper while affording expansive views of the salt flats, which are often filled with birds to work from.  Considering the lengthy session this painting has demanded, I also make good use of the bench as a seat. The swiveling capacity of many scopes to rotate on their axis is a tremendous advantage. In this case I’ve swiveled my Leica Televid APO 77 scope 45 degrees clockwise for ease of viewing over the banister.

The photos from Magee Marsh were first included in a post about the Biggest Week on the Traveling Trinovid Blog. You may also be interested in the following articles:

Start with Gestures

Warming up your arms, sharpening your observation skills, and finding forms on paper through the use of line.

By doing gesture drawings, we make use of an excellent way of gaining an understanding of birds and their forms.  With gesture drawings, we are searching for the three-dimensional shapes of birds by making fluid marks on the paper. Without being overly concerned about details, our lines are brisk maps of the bird’s postures and attitudes.

More importantly, gestures are a great way of warming up our arms and hand-eye coordination. They allow us to have fun with our work, learning to be less precious about our markings and open to possibilities and growth. Gestures give us the freedom to search and find the way for our lines.

Get Started!

TOOLS: Just about any medium will do for drawing gestures, but self-contained tools such as a pencil or a pen are easier for beginners than paints. Consider using a graphite pencil, a felt-tip marker, a charcoal stick or a pastel. Use a drawing pad of a comfortable size – large enough for loose drawings and portable enough to be taken on every outing.

SUBJECT: Take your drawing pad out everywhere you can. While your primary interest may be sketching birds, practice doing gesture drawings of animate and inanimate objects. Take your pad out when you are birding – or when you are out in nature in general. Stop briefly to make gestures of every bird you see. Do quick sketches of leaves, mushrooms, rock formations, etc. Get into the habit!

Gray Catbird gestures GALVEZ
Gesture drawings of a Gray Catbird done with charcoal at Fort Zachary Taylor, Key West, Spring 2012. As the catbird foraged on the floor and changed positions, I made fast sketches of its various postures. These are only 4 out of many. Some are just a few lines, but I tried to address the entire bird in each, not being too concerned with details, but with portraying the action. Each drawing is roughly 7 inches in size, done on a large newsprint pad.
  • Make your gestures loose and as large as space allows.
  • Use your entire arm while drawing! Wrists alone have limited movement.
  • Don’t spend much time on each gesture, a minute or two will do.
  • Do several gestures one after the other.
  • Spend as much time observing as you do sketching.

What we are trying to capture with gesture drawings is the character of the bird, not necessarily its details. The character may be in its posture or behavior. Ask yourself these questions: How is your subject holding its head in relation to its body? Where is its center of gravity? Where are the legs in relation to its body? Is the body or head foreshortened? What is the tail doing? Always ask questions while gesturing, and look for the answers in brief strokes.

Getting Ahead: Before you go out sketching birds in the field, familiarize yourself with the parts of birds, even if it is a general understanding. The more you know about bird topography, particularly the feather groupings, the better prepared you will be at drawing birds with accuracy.

You may also be interested in these articles:

Field Sketching: Where to Begin?

“How do I get started with sketching  birds in the field?”

While one could get into tedious preparations by buying materials and equipment before making the first marks, all one really needs is a regular old pencil and a pad to get started with field sketching.

But before you get started, you may want to consider the following points:

  • Don’t forget the importance of observation!
  • Practice, Practice Practice!
  • Have lofty goals, but realistic expectations.
  • Start simple.

Below I will delve more into each of these points. These apply when our goal is to depict birds and other wildlife with some degree of accuracy from observation. If you are only interested in copying images or stylizations based on imagination, then worry not about these points:

  • Don’t forget the importance of observation!
    • If you are struggling with drawing the shape of a shorebird, you should remember that the answer to your frustrations is in the shorebird itself. A fair dose of “observation” will give you the necessary information to draw the parts of the bird with more accuracy.
    • If you are spending too much time drawing, and not enough time observing, chances are that you are making things up. You will likely never achieve the degree of desired accuracy in your renderings if you don’t spend plenty of time observing your subject.
    • TRY THIS: Spend no more than 10 seconds sketching after 5 seconds of observation – and so on… Ideally, you want to spend as much time observing as you do sketching.
  • Practice, practice, practice!
    • While it may be relatively easy to pick up a pencil and draw a pleasant stylization of a bird, it takes plenty of practice to draw what we see in the field. Practice goes a long way!
    • Warm up! In the same way we warm-up before exercising, do  gesture drawings to loosen up your arms and hone in your observation skills before committing to longer renderings.
    • TRY THIS: Don’t get too caught up in any one drawing, but do as many quick sketches as possible, aiming to capture different aspects of the bird in each.
Plover-Gestures-GALVEZ
This sample of gesture drawings was done in a few minutes at an agricultural field near my house on an August afternoon. Some of the sketches are no more than a few lines, yet they address the general postures of the birds observed. With more time, I was able to add some pencil smudging to denote volume, and texture.
  • Have lofty goals, but realistic expectations.
    • Your goal may be to create epic paintings with multiple birds and habitat – but remember that it takes time and commitment to grow in this craft.
    • You will also discover that each small step leads to greater accomplishments. Stick to it and you will get far.
    • If you are just beginning, learn to take your work lightly at first. Laugh at mistakes – and make plenty because that is how we learn.
    • TRY THIS:  Make several sketches from observation, without using an eraser* to correct mistakes. Instead, redraw your lines until you find the right shapes.

* Erasers are great tools, but they have their place and time. Don’t get too caught up erasing mistakes.

  • Start simple.
    • To get started, all you really need is a pencil and a pad.
    • See if you can first “capture the gestures” of birds, before getting into any kind of detail.
    • Before setting out on epic sketching expeditions to your nearby preserve, practice on common birds in your backyard – practice gestures on your pet, on people, on inanimate objects, etc.
    • TRY THIS: Keep a small pad handy at all times. Do quick gestures while stuck in a waiting room or when taking a break at work. Remember – these are just practice gestures, so it does not matter how “nice” they look. Move on! 

After you have considered these points, you may realize there is much more to this field sketching business. I am a strong proponent of sketching wildlife through the use of binoculars or a spotting scope – when advantageous. However, if you live near a natural site where birds are accustomed to human proximity, you may not need these tools. A simple and excellent opportunity may be practicing with feeder birds at your backyard.

You may also find the following links useful:

Red-necked Nightjar: ANDALUCÍA

When I visited Andalucía during the spring of 2002, the Red-necked Nightjar (Chotacabras Pardo o Cuellirojo – Caprimulgus ruficollis) had for long been a fascination of mine.  It was a bird I had not yet experienced in the Western Palearctic, and my love of Caprimulgiformes had me searching for the species with increased enthusiasm.

A watercolor study of a Red-necked Nightjar wing, done soon after the bird was found, killed by the roadside.
A watercolor study of a Red-necked Nightjar’s wing, done soon after a bird was found, killed by the roadside.

Red-necked Nightjar searchesDuring the last two weeks of May, I crisscrossed the Costa del Sol several times from Ronda through Málaga, spending some time along the Río Guadalhorce, stopping at Macharaviaya (ancestral home from my father’s side), and eventually passing Almería to the east.

By the time I reached Cabo de Gata – the region’s largest coastal protected natural park – I had seen several excellent species including hundreds of Greater Flamingos, ducks and shorebirds in the salinas (salt flats) of the region, but no Red-necked Nightjars.

A pair of quick sketches on the gessoed rough side of a masonite board. These are relatively underdeveloped, so I hesitated in including them here, but they tell part of the story. Left is Macharaviaya - a whitewashed town near Málaga. Right is a view of the Mediterranean from the coastal cliffs of Cabo de Gata.
A pair of quick sketches on the gessoed rough side of a masonite board. These are relatively underdeveloped, so I hesitated in including them here, but they tell part of the story. Left is Macharaviaya – a whitewashed town near Málaga. Right is a view of the Mediterranean from the coastal cliffs of Cabo de Gata.

During my first night at Cabo de Gata, I camped out near coastal crags that dropped steeply into the Mediterranean, taking drives and hikes up the arid roads and rocky cliffs north of the cape. I had heard an Eagle Owl from this location, so was intent in pushing my investigation well into the night. However, it was when I unexpectedly flushed nightjars from a sandy path that I was truly captivated.

I stopped the car at the sight of a Red-necked Nightjar on the ground, perfectly lit by my headlights, and managed to step out with my watercolor and paper to sketch the bird under the harsh artificial lights.

Red-necked Nightjar in headlamps GALVEZ

Unfortunately, several minutes into my sketch a police vehicle drove up and the bird flew off. I was immediately put under scrutiny and suspicion. The two officers were pleasant gentlemen not much older than me, and were very curious as to what I was doing. I showed them my sketches and they listened to my description of the nocturnal bird with interest. After an awkward moment of silence during which I continued painting under my headlamp, the officers simply excused themselves and drove away.

About a week later, while coiling down mountainous highways from Grazalema towards Málaga late at night,  I saw a vehicle in front of me hit a nightjar. I pulled over to inspect the victim, and found a perfectly intact and fresh C. ruficollis specimen. Arriving at Tarifa – the southernmost coast of southern Spain – I spent it sleepless, doing the sketches included in this post.

The Process

This slideshow requires JavaScript.

1. I typically start most field sketches with a pencil drawing. If the shapes, posture and placement of body parts are not generally accurate in the pencil gesture, then the painting runs the risk of turning out awkward. If the bird flies before I can start applying watercolor, then I’m left with a sketch I can use for future field paintings or as reference for a longer study.

2. In this case, I had the time to put down a substantial amount of watercolor before the bird was flushed. Unfortunately, the nightjar was left half-painted, and I was without a life reference to confidently finish the rendering.

3. However, when I found a dead Red-necked Nightjar days after, and created detailed studies of its plumage, I was able to use my specimen renderings to bring the field sketch to a more complete place.

4. Over the years, I often wondered if I could add just a few strokes to further develop this sketch without ruining it. I kept the hope of returning to Andalucía during spring, and re-encountering a Red-necked Nightjar under similar circumstances, but this has not happened yet. As time went by, the more I looked at the watercolor studies of the deceased bird, the more I felt I should add dabs of color to the field sketch, to give it the desired density. One summer night, as I drove through the Everglades and came upon a Chuck-will’s Widow with my lights, I immediately thought of the nightjar. Both the Red-necked Nightjar and the “Chuck” were until recently classified in the same genus – Caprimulgus (the latter has been recently changed to Antrostomus). Both species are roughly the same size, and both tend to exhibit overall rustier plumages than their congeners. As I carefully observed the Chuck-will’s-widow through my binoculars, it occurred to me that I was gaining useful information to help me develop the field sketch from Andalucía – not in the detail of the plumage or in the shape of the bird, but in the way a nightjar appears under the contrasting lights of car, and how this affects its volume and color.

Why Use Sport Optics to Sketch Wildlife?

In the same way that binoculars and telescopes have revolutionized the way we observe nature, they have revolutionized the way we approach wildlife sketching and painting in the field. The advantages are particularly felt when rendering birds; their fleeting nature and small size make it often difficult to get close looks without flushing them. Sport optics allow us to see great detail, even at a distance.

The key to good field sketches is plenty of time observing. By holding a sketch pad in one hand, I can use the binoculars with the other.
The key to good field sketches is to spend as much time observing your subject as possible. By holding a sketch pad in one hand, I can use the binoculars with the other. This way, I can go back and forth quickly between views and drawing to give my thumbnails the necessary character.

Binoculars give you the portability to do sketches on-the-go while using a small sketch pad. This is a great way of loosening up and doing quick gestures. You’d be surprised how much of a bird’s posture and behavior you can capture in this manner. It is an excellent way of quickly retaining information about your observations while you are birding and will help you better understand birds in the long run.

With their greater magnification, spotting scopes are excellent for observing extreme detail on birds. Once upon a time, only a bird in the hand could have given us such information to complete our drawings and paintings. With practice, it is possible to create accurate renderings of birds and other wildlife based entirely on observation through a scope, without the need for additional source material. With the stability of the tripod, you may spend lengthy periods of observation while developing complex drawing and paintings.

The stability of a scope and tripod frees your hands for lengthier sketches.

But why use binoculars or a scope to draw wildlife, when one could just take multiple photographs and video, and paint from the comfort of the studio?

While some like to work exclusively from photographs, I like to base my work as much as possible on the field experience. My position on the use of photographs is that it would be a big loss of a tremendous opportunity not to take advantage of their ready availability as reference material. Where many err in the use of photos is when they copy ONE image, and inevitably turn out a lifeless drawing.

But at the end of the day, it is all about what you want to get from a sketch or a painting. If all you are interested in is the pure enjoyment of expressing animals through an unrestricted use of form and color, then field sketching with optics may not be the challenge for you.

As I observed a Snail Kite on its perch, I took advantage of its head constantly turning to understand its complex bill from different perspectives.
As I observed a Snail Kite on its perch, I took advantage of its head constantly turning to learn more about its complex bill and head by sketching it from different perspectives.

The great advantage of working from a living subject is the opportunity to observe and understand its form “in the round.” Copying one photograph will never give you that advantage, since you can only see the “shape” of the bird as dictated by its particular frozen posture at the time the picture was taken, and not its “form” and volume.

Illustrations of Snail Kites from "A Field Guide to Hawks, North America" by Clark and Wheeler (1987). The depictions of birds in field guides have traditionally been rendered with a graphic flatness conducive of their use as comparative images.
Illustrations of Snail Kites from “A Field Guide to Hawks, North America” by Clark and Wheeler (1987). The depictions of birds in field guides have traditionally been rendered with a graphic flatness conducive of their use as comparative images.

For many of us with a long history of ingesting bird paintings primarily through the use of field guides, it is as if we’ve conditioned ourselves to the depiction of birds as flat icons.

In reality, birds – and most animals – are all but flat. Many bird species are quite sculptural, and the forms of some may change quite radically depending on their posture, behavior, and on the angle from which we are viewing them. Light and the use of feathers also play a tremendous role on how we perceive birds. Binoculars and scopes are great tool that will help you study birds though your sketches with more intimacy and precision, allowing you access to information that will strengthen your drawings and give you a deeper understanding of your subject matter.

Like most challenging endeavors, practice and patience are important. Below are links to a series of articles covering topics related to sketching in the field through binoculars and spotting scopes:

A Common Black Hawk with Dark Legs?

Here are some sketches from my June of 2012 trip to Trinidad & Tobago. Below is the lower portion of a spread done at the Caroni Swamp in northeastern Trinidad. To the left is a Common Black Hawk (Buteogallus anthracinus) and to the right a pair of Tropical Screech-Owls (Megascops choliba).

coblackhawk-tropical-screech GALVEZ

I lugged around nice paper, watercolors and favorite pads, but 80% of the sketches I did were pencil thumbnails on a 3.5” x 5.5” Moleskine originally meant for notes. Since it had been raining most of the trip, I found it more prudent to quickly pull out this pad from my pocket and sketch. It was a run and gun trip – mostly a birdwatching group and they liked a quick pace.

Dark Legs on a Common Black Hawk?

Everyone knows that Common Black Hawks – and all Buteogallus sp. – have yellow legs. Well how did I wind up with dark legs in my sketches?

It turns out I captured the mud-caked legs of a bird, which appeared naturally dark at first. Common Black Hawks that live in mangrove habitats will often walk over the mud, foraging for crabs or fish stranded by the tides. And anyone who’s ever walked on mangrove shallows knows how soft this clay can be. In South Florida, I’ve often seen egrets, spoonbills and shorebirds with dark legs as a result of walking on this clay.

This slideshow requires JavaScript.

I often wonder whether I capture any information of value in my sketches. Photographs can hold so much detail that one often discovers minutia in them that wasn’t necessarily noticeable in the field. Not to mention the speed of it compared to sketching.

We were cruising on a flats boat through the Caroni Swamp when this Common Black Hawk was discovered, perched on the branches of a Red Mangrove. We must have spent no more than five minutes on this bird, as it flew from one perch to another. It is rare that I have the luxury of pulling out the desired paper and watercolors while the bird is posing for me.

The screech-owls were deep in the mangroves along the path leading to the boat ramp. I was still trying to sketch the forms of nearby Red-capped Cardinals when the owls were announced. It seemed as if the photographers in our group were challenged by branch obstructions – yet I don’t doubt that some phenomenal photos resulted from this. I must have spent no more than eight minutes on this sketch. Sure, it does not hold enough information for me to derive a complete painting from it, but combined with future sketches, I might have enough to compose something worthy.

RBTR Little Tobago GALVEZ

Often, sketches are no more than quick lines. In them, I try to capture jizz and form first. If I don’t have the right shapes to begin with, it won’t matter how much detail I add. The image will only be a stylization. We spent no more than 15 minutes at the overlook from Little Tobago Island, from where we watched Red-billed Tropicbirds, Red-footed and Brown Boobies fly by.

All these sketches were done while observing birds in the field using Leica Ultravid 8×32 HD binoculars. Their compact and lightweight build are perfect for holding with one hand while sketching with the other. The short length of their barrels allows for excellent bright and crisp images, which compensate for less magnification.

This article was originally posted in the Florida Keys Hawkwatch blog on July 23, 2012.

TRINIDAD: NATURE & WILDLIFE ART WORKSHOP
FEBRUARY 23 – MARCH 1, 2017

VENT2_kicsi

To find our more about tours led by Rafael Galvez visit the
Victor Emanuel Nature Tours website.